

How To Refinish Wood Window Trim
Trim Repair: How to Fix and Revive Trim
Updated: Jun. 19, 2019
Renew dull trim in one weekend.
Renew the lustrous appearance of stained and varnished woodwork without the messy stripping process. We evidence you how.
You might as well like: TBD
- Fourth dimension
- Complexity
- Cost
- A full twenty-four hour period
- Beginner
- $51–100
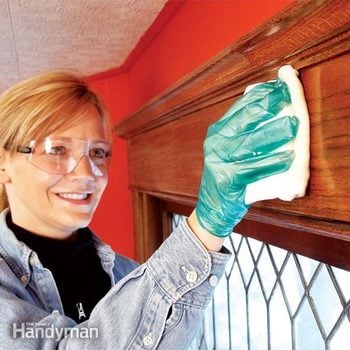
Pace one: Showtime with a thorough cleaning
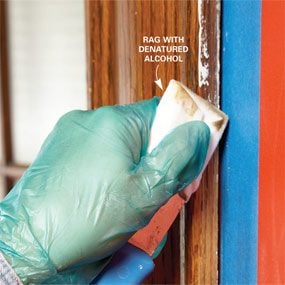
Photo 1: Remove onetime paint spots
Soften sometime paint along the edges of trim and stained baseboards with alcohol. A rag wrapped around a putty knife lets you scrub the trim without slopping alcohol onto the wall.
You can dramatically better the appearance of stained baseboards and varnished woodwork without all the work and mess of a complete stripping and refinishing job. We'll evidence you a much easier process here—and y'all may even be able to eliminate some steps if your woodwork is in better shape than ours. But gather the supplies in a 5-gallon bucket and tackle the renewal project ane window or door at a time whenever you accept a few spare hours. Start in a corner or in an inconspicuous area—improve to learn from your mistakes there than on the front door.
The kickoff step in renewing your woodwork and stained baseboards is cleaning it to remove grease and grime and create a contaminant-free surface for the new finish. Wash the woodwork with a TSP substitute. Utilize merely enough cleaner to wet the surface. Scrub with a sponge dipped in the cleaning solution. And so rinse with a sponge and articulate water and wipe off the wood with a dry out rag.
If there's paint slopped onto the edges of your trim or spattered on the surface, now's the time to clean it off. A rag dampened with denatured alcohol will remove most pigment spatters (Photograph 1). Booze won't impairment nearly finishes, simply it will dissolve shellac. Don't worry if some of the finish comes off. You can bear upon information technology upwardly later (Photo 7). Protect the walls with masking tape to prevent the alcohol from damaging the pigment. For tougher pigment spatters, utilize a fine synthetic annoying pad (such as a 3M Wood Finishing Pad) dipped in denatured alcohol.
Step ii: Scrape and sand badly damaged areas

Photo two: Scrape eroded areas
Scrape away desperately weathered finish. A carbide paint scraper removes the quondam finish much faster than sandpaper. But exist careful not to gouge the wood.
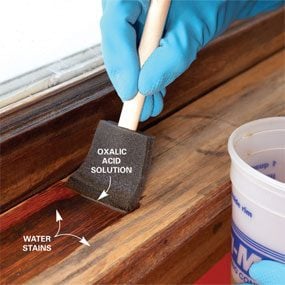
Photograph three: Bleach out dark stains
Bleach away deep stains that scraping or sanding won't remove. You lot don't have to scrub; just permit the oxalic acrid penetrate and lighten the stain.
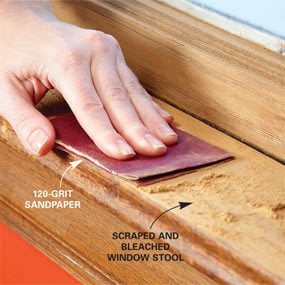
Photo 4: Sand bleached areas
Sand the bleached wood later information technology dries. Start with 120-grit sandpaper. Then sand with 180-grit. Vacuum the dust before staining and finishing.
Window stools and other areas exposed to moisture and sunlight may demand to be completely refinished. In spots such as these where the woods is discolored and the end worn abroad, you'll get the best results by scraping and sanding to expose bare woods (Photos ii and 4).
If the woods has dark water stains that scraping and sanding won't remove, yous tin remove them with oxalic acid (Photo 3).
Circumspection: Habiliment protective gear, including goggles, safe gloves and a long-sleeve shirt, when you piece of work with oxalic acrid. Mix the oxalic acid in a plastic container. Add i oz. of oxalic acrid powder (about 2 tablespoons) to one cup of hot water and stir it until the pulverisation dissolves. Then castor the solution onto the stain with a disposable sponge brush and let it work for 20 minutes. You can repeat the process to further lighten the stain. Wipe the bleached wood with a sponge and clear water. Then neutralize the oxalic acid by applying a solution of 3 tablespoons of borax to one gallon of water with a sponge. Finally, rinse the bleached woods with h2o again and allow information technology dry overnight. And so sand information technology with 120-grit followed by 180-grit sandpaper (Photo iv) and stain information technology to match the residue of the woodwork.
Step 3: Roughen the end and fill small holes

Photo five: Roughen the old cease
Rub the wood with an abrasive pad to create a slightly roughened surface for the new finish. Vacuum the dust from the surface before wiping on a new coat of terminate.

Photograph half dozen: Fill up holes
Fill up holes with perfectly matched putty. Just knead unlike colors together until you go an exact match.
To make new finishes stick well, slightly roughen the former finish first (Photo 5). Synthetic finishing pads are the best choice because they conform to profiles and aren't as aggressive equally sandpaper. Buy medium and fine and experiment in an inconspicuous expanse. Employ the pad that roughens the finish without removing whatever stain.
Make full holes left by nails or screws with soft wood putty. Woods putty is available in many colors that you can blend for a perfect match. Application is easy. Yous just push it into the hole and wipe it off (Photo vi). There's no sanding required. Buy several shades of putty, ranging from dark to light, that are similar to the color of your trim. And so mix them to match the forest surrounding the hole. Push the putty into the hole and wipe off the excess with your fingertip. Then remove residue from around the hole past wiping over it with a make clean rag. If your woodwork has filled smash holes that have darkened and no longer friction match, choice the one-time filler out and replace it with soft putty. Buy h2o-based putty if you plan to use h2o-based polyurethane.
Step 4: Employ stain to hide dings and scratches
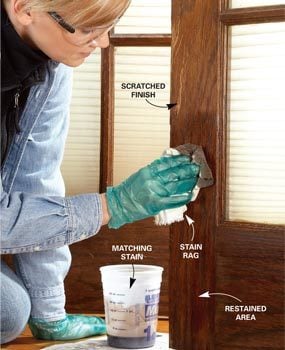
Photograph vii: Use matching stain
Hide scratches, chips and worn away stop with a fresh dose of stain. And then wipe the woodwork with a clean rag to remove the backlog stain. Let the stain dry overnight.
Completely refinishing the surface area may be the only way to make flawless repairs to badly damaged doors, windows and moldings. Only yous can greatly improve the overall appearance of worn or damaged wood with less drastic measures.
Disguise large areas where the stain is worn away by dabbing stain over the light areas to blend them in. The patched area may not lucifer exactly, but at least the spot will be less obvious. Or simply wipe the surface of the wood with a rag dipped in stain to fill in pocket-size scratches and imperfections—you'll encounter a large improvement (Photo 7). Wipe the stain on. And then wipe off the backlog with a clean rag. Allow the stain to dry out overnight before you apply the finish.
One of the trickiest parts of a wood restoration projection is finding stain to match. Yous can pry off a minor piece of trim and ask the pigment department to mix stain to lucifer. Some paint stores and home centers offer inexpensive sample packets of stain. You can choose several samples that are close to the color of your wood and experiment in a hidden expanse to find the best color friction match. And then buy a larger container. Some other arroyo is to buy 2 or three cans of stain that are shut to the color of your woodwork and mix them to become the right colour. Use an eyedropper and dispensable plastic cups to mix small batches until yous get the proportions right. Continue notes so you can reproduce the results in a larger batch.
Footstep five: Apply the fresh finish
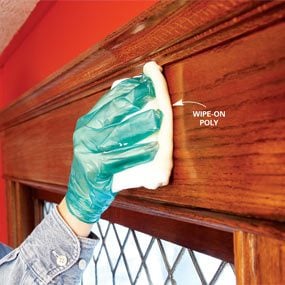
Photo 8: Wipe on polyurethane
Restore the shine with a fresh coat of polyurethane. Wipe on poly gives yous a faster, smoother end with less mess than brush-on poly.
The final footstep in your trim renewal project is to apply a fresh coat of cease. Wipe-on polyurethane is a skilful pick because it's fast and piece of cake to use. You but wipe it on with a soft rag and let it dry. Each coat is very sparse and dries quickly. You can recoat in two or three hours if you desire a thicker stop for extra protection. Several coats of wipe-on polyurethane are required to equal the thickness of one coat of brushed-on varnish, merely information technology'south easier to get a smooth, baste-free finish with wipe-on poly.
Fold a cotton rag to create a pad. Then dip an border of the pad into a container of wipe-on polyurethane and press information technology against the side to wring out the backlog. Wipe the polyurethane onto the wood in long strokes in the direction of the forest grain as y'all would if you were using a brush.
For window stools or other trim exposed to sunlight, consider using spar varnish. Spar varnish has born ultraviolet protection and is more flexible, so it holds up better in areas exposed to sunlight and water. Experiment on a scrap of trim or in an inconspicuous expanse to come across if the slightly amber tint darkens the color besides much. When you've completed all of the steps higher up, your woodwork will wait similar new and exist protected by a fresh layer of end. If you don't have fourth dimension to exercise an entire room from beginning to cease, merely tackle one door or window whenever you have a few spare hours. You'll exist done with a room before y'all know it.
Circular Up Your Supplies
Yous'll need the materials and supplies listed in "Boosted information" below for a bones wood renewal project, including several for refinishing window stools and removing stains. Nearly of the tools and supplies are available at paint stores, total-service hardware stores and habitation centers. Visit an fine art supply shop for the artists' markers. Oxalic acid is available online at rockler.com or at woodworking stores and some hardware stores and lumberyards.
Faux Wood Patch
Dings and dents too large to fill with soft putty present a unique challenge. If you can't replace the forest, the adjacent all-time thing is to patch the impairment with filler and colour the patch to match. Use hardening-type filler similar Durham'due south Rock Hard Water Putty. Apply the filler carefully with equally niggling excess as possible to minimize sanding. Permit the filler dry out and sand it smoothen, being careful to avert sanding away the terminate on the surrounding forest. Then use felt tip markers to "paint" the patch to match (photos below). Art supply stores are the all-time source of markers—you lot'll find countless shades of brown. Almost other stores acquit only 1 or ii. The repair won't be perfect, just you may be surprised by how inconspicuous it is from a distance.
Required Tools for this Project
Have the necessary tools for this DIY project lined up before you start—you'll save fourth dimension and frustration.
Condom gloves
Required Materials for this Projection
Avoid terminal-minute shopping trips by having all your materials ready alee of time. Hither's a list.
Originally Published: January 07, 2019
Source: https://www.familyhandyman.com/project/trim-repair-how-to-fix-and-revive-trim/
Posted by: worshammarithere.blogspot.com
0 Response to "How To Refinish Wood Window Trim"
Post a Comment